I love eating Manti more than making it. Wonderful taste, it takes a bit long time to make but eating takes 5 mins. Not fair! :)
My husband, of course, loves it, too. He was always bugging me to cook it soon. Finally, I cooked it. Everyone is happy now.:)
In my country, you can find different types of Manti. Recipe varies region to region. I learned it from my grandma and my mum. They used to make the way I described below. Hopefully, one day, my kids can learn it from me! :))
 My grandma has a lot of grandchildren. I remember her making Manti for all of us, when I was a little girl. We used to help her. She used to put a few chickpeas inside the Manti. The idea was if you could find the chickpea while eating, you will be the luckiest grandchild. We loved this game. :)
Now, I honor the tradition by putting two chickpeas when I make it. My husband is very lucky not just because he has me, but also he found the first chickpea in the first spoon today.:)))
Here are my first recipes, I hope you will enjoy them.
Manti Recipe:
Ingredients:
- 3 cups all purpose flour
- 1 cup water
- 1 large egg
- 1 tablespoon olive oil
- 1 teaspoon salt
- 250 gr ground meat
- 1 large onion (chopped in very small pieces)
- Salt and black pepper
- 2 cups plain yogurt
- 2-3 cloves of garlic
- 1/4 cup water
- 1/2 teaspoon salt
- 6-7 tablespoons olive oil
- 2 teaspoons red pepper ( hot or mild, its up to you)
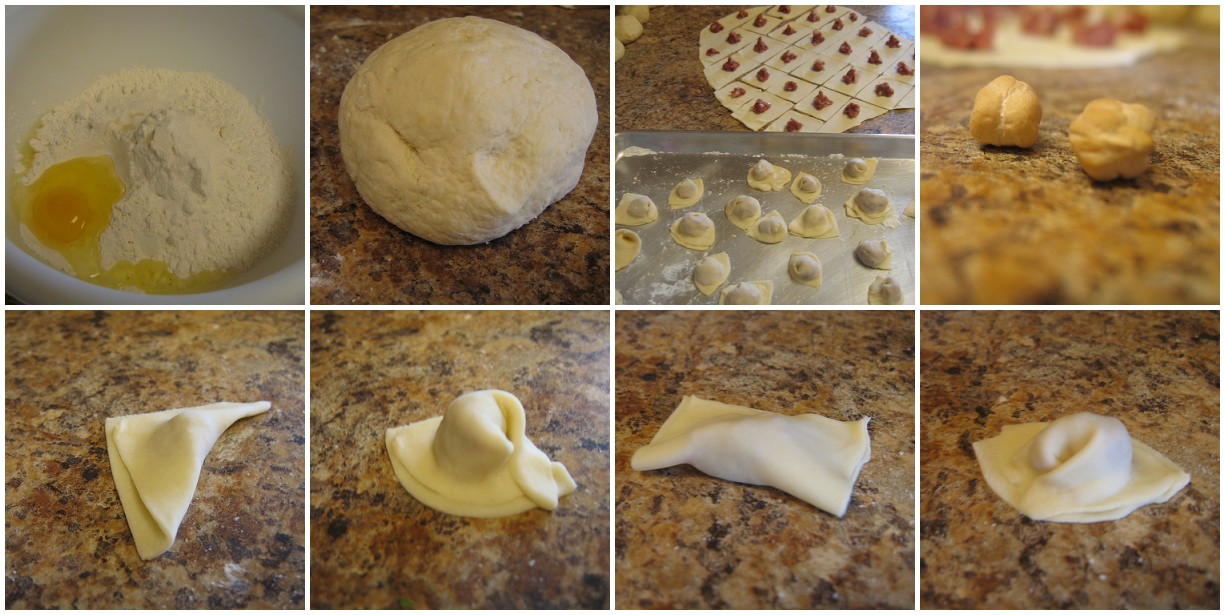
- In a large bowl, stir together the flour, water, egg, olive oil and salt.
- Knead them very well until the dough is formed. The dough should be smooth and not sticky. If you feel it is sticky, add a little bit more flour.
- Cover the bowl with some plastic wrap and let stand at cool room temperature for an hour.
- Meanwhile, prepare the filling. In a medium bowl, put onions, meat, salt and black pepper. Knead them together for one minute (do not cook.)
- Lightly dust a work surface and a rolling pin with flour. Divide the dough into 4 equal balls. Roll out each ball into sheets as thin as you can roll out, but be careful don't tear it.
- Cut each sheet into squares of about 1.5"x1.5".Put a very small piece of filling at the center of each square. Continue until the dough is finished.
- As you see below, bring the opposite corners together and make a triangle or, fold them to make a rectangle. Both works fine. Press the sides firmly. (Don't forget to hide your chickpeas for the game. :)
- Bring two of the adjacent corners together as shown in the picture.
- In a large pot, boil the water and add a little bit salt, olive oil. Add Manti and stir. Cook for about 15 minutes. Please check while cooking. Don't overcook.
- Meanwhile, prepare the sauces. Firstly, in a small bowl, grate cloves of garlic and add yogurt, water, salt. Stir them together. Secondly, in a separate sauce pan add olive oil and red pepper, stir together and cook them only for half a minute.
- When Manti is ready, you can drain well or not, the way you like, it is up to you.
- Serve warm with yogurt sauce and red sauce.

Fake Manti:

 Also, there is another option for Manti. In Turkey, we call it Fake Manti. It doesn't taste the same as original Manti, but pretty close.
Lazy girls, like me, love it :)
You only need; shell pasta instead of dough.
Enjoy Fake Manti, too.


